

Installing the Marlin 1894 and 1895 Crossbolt Safety Delete With Saddle Ring
Posted by Honus Titcomb on Jun 7th 2019
Use the proper slot head style screwdriver specific for working on firearms to avoid damaging the factory hardware.
1. Make certain the rifle is unloaded and point it in a safe direction.
2. Remove the butt stock from the rifle by removing the single stock screw.

3. Use a 5/64” allen (hex key) wrench to remove the factory screw shown:

4. The factory hardware holding the cross-bolt safety in consists of a set screw, spring and steel ball. The factory crossbolt safety will fall out if the hammer is pulled back.

5. Remove the screw cap from the saddle ring safety delete and insert the pin with ring into the left side of the receiver where the safety was removed.
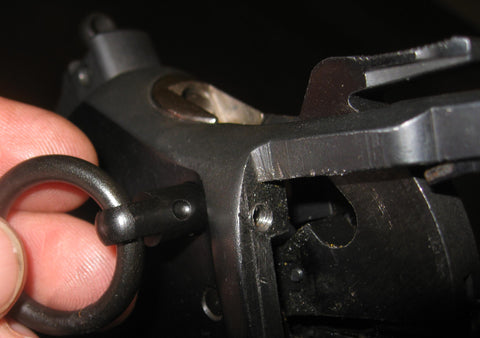
6. Align the indentation in the safety delete with the hole for the factory set screw, spring and steel ball. For the safety delete to be installed correctly, the indent in the pin must be aligned with the set screw hole. Lower the hammer carefully to rest against the firing pin. The hammer will not go all the way against the firing pin if the safety delete is not installed correctly. Note that some saddle ring safety deletes have a ring that can rotate front and back, while others rotate up and down. It depends on the orientation of the way the stud was constructed. The point is to align the dent on the stud with the hole for the set screw or factory hardware.

.
7. From the right side of the receiver, insert the screw cap for the safety delete saddle ring pin. Make sure it does not become cross threaded, and snug tighten it with a screwdriver.

8. Reinstall the factory hardware without the spring. If the saddle ring will not be used heavily, the factory screw tightened against the steel ball should hold the part in place securely enough to prevent it from rotating. If you plan on using the saddle ring to attach a sling or support the rifle in anyway, you will need to tap the hole for the factory hardware with an 8-32 tap. The set screw included with the saddle ring safety delete is intended to be used if the receiver is tapped. The existing factory threads should be 8-32, but this needs to be verified by you or a gunsmith. In most rifles, the threads for the factory hardware do not go all the way down to the safety delete. They need to be continued with a tap in order to put in one solid set screw and secure the saddle ring safety delete in place. Please do not tap the receiver if you are not comfortable or qualified to do so; severe damage could occur to your rifle's receiver. If necessary, take it to a gunsmith to have the saddle ring installed.
An alternative to tapping or using the factory hardware is to use a "lock pin" followed by a set screw available at this link: 8-32 Set Screw and Lock Pin.
9. After the safety delete with saddle ring is installed, reinstall the buttstock and buttstock screw.
For more information on the safety delete installation please read the article HERE
Saddle ring safety deletes available on the site HERE
Determining whether or not disabling the factory cross-bolt safety is appropriate is the responsibility of the firearm's owner or user. By purchasing this product and installing it you are assuming all responsibility and consequences that may result from altering the factory cross-bolt safety that comes with the firearm. Disabling the factory cross-bolt safety can result in an increased possibility of accidental discharge that could result in injury or worse. Additional caution and special attention should be used when using a firearm with a disabled cross-bolt safety. Always treat a firearm as if it could discharge at any moment to avoid accidents.