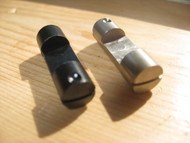
Installing the Marlin 1894 and 1895 Crossbolt Safety Replacement Pin (basic safety delete)
Posted by Honus Titcomb on Jun 7th 2019
Use the proper slot head style screwdriver specific for working on firearms to avoid damaging the factory hardware.
- Make certain the rifle is unloaded and point it in a safe direction.
- Remove the butt stock from the rifle by removing the single stock screw.

- Use a 5/64” allen (hex key) wrench to remove the factory screw shown:

- The factory hardware holding the cross-bolt safety in consists of a set screw, spring and steel ball. The factory crossbolt safety will fall out if the hammer is pulled back.

- Insert the safety replacement into the right side of the receiver with the slotted end of the pin aligning with the right side of the receiver once the pin is inserted. Shown below

- Align the detent in the pin with the hole that the factory hardware was removed from. Then lower the hammer carefully to rest against the firing pin. Reinstall the factory hardware. The steel ball goes first followed by the spring, then the factory set screw. The spring can be left out if chosen.

- Reinstall the buttstock and buttstock screw.
For more detailed information on the safety deletes please read the article HERE
Safety Deletes available HERE

Left side of rifle with basic safety delete installed
Determining whether or not disabling the factory cross-bolt safety is appropriate is the responsibility of the firearm's owner or user. By purchasing this product and installing it you are assuming all responsibility and consequences that may result from altering the factory cross-bolt safety that comes with the firearm. Disabling the factory cross-bolt safety can result in an increased possibility of accidental discharge that could result in injury or worse. Additional caution and special attention should be used when using a firearm with a disabled cross-bolt safety. Always treat a firearm as if it could discharge at any moment to avoid accidents.

